Posts

Showing posts from 2019

Toolkit 2: Maya - Pipeline 1 Head Modelling - The Brow

Image
After completing the Brow tutorial, I'm starting to feel that there are certain pieces of geometry need some more adjusting, and will continue to clean them up as I go. It was a little tedious trying to place everything correctly, but overall the model is coming along nicely, even if it doesn't look exactly like the orthographs. 

Toolkit 2: Maya - Pipeline 1 Head Modelling - The Nose

Image
For this tutorial, I modelled the nose for Jet Pack Jones. I had a lot of fun figuring out the positioning of the faces and I found it pretty manageable. However, I'm trying to figure why there is a bit of pulling on the forehead after using the multi-cut tool. It is something that I will have to experiment with and see where I can take it in the next tutorial.

Toolkit 2: Maya - Lighting & Rendering 2 - Stand Ins (Proxies)

Image
This tutorial was fairly straightforward, and it's extremely handy to know how to create stand ins, especially if an animated scene required a lot of models to use.

Film Review: Collaboration Submission

 Disney’s “Hercules” (1997) - The Hero’s Journey http://chelsea-a-butler.blogspot.com/2019/10/film-review-hercules-1997-heros-journey.html Dreamwork’s “Rise of the Guardians” (2012) - Character Archetypes http://chelsea-a-butler.blogspot.com/2019/10/film-review-dreamworks-rise-of.html Steven Spielberg’s “ Indiana Jones and the Raiders of the Lost Ark ” (1981) - Three Act Structure http://chelsea-a-butler.blogspot.com/2019/11/film-review-steven-spielbergs-indiana.html Tom Tykwer’s “Run Lola Run” (1998) - Non-Linear Structure http://chelsea-a-butler.blogspot.com/2019/12/film-review-tom-tykwers-run-lola-run.html

Collaboration: Reflective Statement

Image
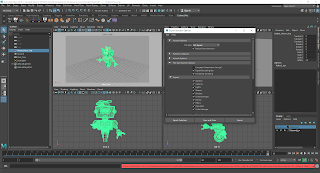
As the Collaboration project has now been completed, I would like to reflect upon my efforts and contributions towards it. I must admit, that although I understood the amount of commitment I needed to provide, I was still a bit surprised at how much work each of the tasks would entail. It has been stressful, but rewarding nonetheless, as I feel that I have accomplished more than I would’ve thought I could. However, saying that, I feel that my skills are below average, meaning I have a lot of work to do to improve myself, especially in my communication with my team, and my animating skills. I feel like I could’ve achieved much more if I managed my time properly, but I think my biggest obstacle is knowing how to ask for help, out of fear of appearing silly, but also not knowing what to ask. Animation is difficult for me to process and understand, which is why my part of our final animation looks unfinished. In all honesty, Collaboration has been difficult to come to terms with, a

Film Review: Tom Tykwer's "Run Lola Run" (1998) - Non-Linear Structure

Image
Figure 1. ‘Run Lola Run Movie Poster’  Action, excitement, a ticking time bomb that’s waiting to explode, “Run Lola Run” (1998), directed by  Tom Tykwer,  is a suspense filled journey that follows the story of Lola and her boyfriend Manni, who are both against the clock and the world to make a payment in time to Manni’s gangster boss before he is killed by them. The film follows a non-linear structure in that none of the events occurring are straight forward and chronological. The film is in a loop, a zig-zag formation, as if Lola is hitting a “retry” button when thing’s don’t quite go to plan.  In the beginning, Lola receives a phone call from her boyfriend Manni, who is in a state of panic. He was on his way to deliver 100,000 Deutsche marks to his boss from a job, but ends up losing the money bag on a train, and having a homeless man inspect the bag and make off with it. With only 20 minutes until the deadline, Lola is forced to come up with a plan to save Manni, as

Collaboration: The Art of Captain America: Civil War - Outtakes with Final Animation

Image
Art of Outtakes by Chelsea Butler on Scribd

Character Design: One Day Design Challenge

Image
 For our last Character Design lesson of the term, we were tasked with creating a set of characters within one day.We were given a show to base these characters around and explore how they would fit in to that universe.  My group received the show Rusty Rivets, a children's program that centres around the character Rusty and his friends going on adventures and using science and engineering along the way. Each group member was tasked with designing a Hero, a Villain, a Mentor, and a Sidekick. I chose to design the hero. To start with, we needed to create a toy play set that could be marketed as part of the shows franchise. Below I created a doll's laboratory which is can be collapsed in to a tool box for ease of transport. Inside features miniature science kits, a doll of my hero character, accessories for the doll, and a mech suit that the hero character designs within the show.  Secondly, I then needed to design the hero character. I imagined this character be

Collaboration: Scene 2 Playblast

Image
Here is a quick playblast of one of the scenes that will be featured in our group animation. I used pose-to-pose animation to figure out the movements of each character. I have found this task to be a bit difficult, but I will do my best to keep working on the animation.

Character Design: Logo and Poster Design Exploration

Image
For today's Character lesson, we got to explore logo and poster design. For the logo challenge, we were given a name for a corporate company and had to base the idea around that. I got Alien Corp. and so I thought about the idea of a conspiracy theory investigation company, possibly seeking the "answers" to alien life and how they can protect it from government exploitation. Next, we moved on to poster design. We had to choose a live action film and recreate the movie poster in a simplistic format. I chose Raiders of the Lost Ark, and wanted to pick out key scenes to focus on that sort of encapsulates the film. Lastly, we then continued to work on our character projects. As the deadline draws closer, we need to now start thinking about putting our work together in to a production bible. I have made a start on my character turnarounds and the storyboard for one significant scene for my characters love story.

Character Design: Perspective

Image
For our Character Design lesson on Tuesday, out tutor Justin thought us about how to create perspective in our art. There were so many different ways to utilise the one, two and three point perspective techniques. To put it into practise, we were instructed to take a scene from our project's story and recreate it using a type of perspective that we thought best.  I first started off by creating the scene with my two main characters meeting at the Eiffel Tower. I used three point perspective to create the image above, but I didn't think it was successful because my story is meant to be quite intimate, and this seems too far away to recognise that emotion.  I then tried a one point perspective to see how that would play out with a French cafe environment. Just gave me some advice on how I could take the first image and make it more close up and intimate. This helped me to improve my three point perspective a little bit, and gave me a better idea as to how

Toolkit 2: Maya - Lighting & Rendering 2 - Fog (Legacy) & Atmosphere

Image
This tutorial was a lot of fun to experiment with, I really enjoy looking at colouring and atmosphere. I'm still getting the hang of some of the technical names for each setting, but I think I will improve as I explore in to this more.

Toolkit 2: Maya - Lighting & Rendering 2 - Depth of Field

Image
After completing this tutorial, I realise that although I managed to recreate the image, there was a lot of menus and settings that I'm not too sure I'll completely remember without having to refer back to the tutorial. I think I need some practise at remembering the different terminology for each setting and its effect.