Posts

Showing posts from December, 2020

Minor: Linette Hair Model Progress

Image
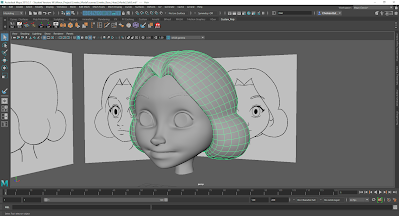
 This is one of the two hairstyles that I have created for my character Linette. I am still in the process of adjusting it, but I think I have captured the overall shape mostly. I am struggling a little bit as this is my first time modelling hair, but I think I have made good progress so far.        

Minor: René Head Model Progress

Image
 So this is the modelling progress that I have made for my second character of my animation, RenĂ©. I had a little trouble when creating the nose because I designed it to be quite long, but I think I managed to resolve the issue. The only thing left to do now is to model the hair. 

Meg’s Art Jam: Session 3 - All Year Challenge

Image
 For this art jam session, Meg gave us a mash up challenge. We were told to take our favourite video game character and draw them doing a particular activity using the art style of our favourite TV show/movie/animation. For my mash up, I chose the characters Link and Zelda (from The Legend of Zelda), the activity was making coffee, and the art style was from one of my favourite shows, JoJo’s Bizarre Adventure. The style of that show is very exaggerated and bold, so I found it a little difficult to interpret but I had a lot of fun. 

Minor: Linette Head Model Progress 2

Image
Here is the further progress I have made with creating the base head model for my character Linette. I have now created a pair of ears, eyes, eyebrows, eyelashes and a throat for her. Because there is going to be a "human" version and a "ghost" version of this character, I now plan to use this base to then create two separate hairstyles and clothes for when I begin modelling the bodies. 

Maya: Photogrammetry - Part 4 Option 1 (Static Match) - Non-Compositing (Single Pass) Integration of Objects

Image
For this tutorial, we used an in-camera method to light and render a set of added objects in the scene. In this case, we used some polygon spheres. This method can be good to quickly create a set of shadows where the additional objects are, however it falls in terms of creating finer detail, such as how it won't be able to match the grain of the ground in the image.

Maya: Photogrammetry - Part 3 Scene Modelling

Image
This tutorial was a continuation of modelling the scene in Maya. This was about including more detail in our models as well as creating different attributes for our in-scene camera. There was a lot of fine tuning to be done in terms of getting the camera angle close enough to match the photograph that was edited and imported. It was important that we took our time to get the different shapes and edges into the correct positions.

Maya: Photogrammetry - Part 1 Lens Correction and Part 2 Camera & Scene Matching in 3D

Image
For the Part 1 tutorial, we needed to start off in Photoshop so that we could find out information about the photographs, as well as use the Lens Correction filter to adjust them. This allowed us to straighten the photographs so that we could make them Maya ready so that we can model accurately.         As for the Part 2 tutorial, we then moved over to Maya with our now edited photographs to then begin the scene matching process.   We created a set of shapes and planes in Maya to represent the different elements of the photograph, which will then help create the scene.